Friday

Format a Write Protected USB Pendrive or Memory Card


Sometimes when we try to format pendrive or memory card, a message appears to us, the disk is write-protected. Then we cannot format it in the normal way, so we have to do different things. I am going to tell you some ways.


Method 1. Remove write-protection from registry.


Step 1. Click on Start > Run, type "regedit" in the run box. This will open the registory editor. Then follow the below path :


HKEY_LOCAL_MACHINE\SYSTEM\CurrentControlSet\Control\StorageDevicePolicies


When you will click on StorageDevicePolicies, you will see a picture like below 


Step 2. Right click on the "writeprotect".

Step 3. Edit the value to 0 and click on ok.


Restart your system so that the changes will take effect and try to format your pen drive or memory card. 

If you do not find StorageDevicePolicies, you can try creating a key, click on control > right click on the white place > New > Key and enter the name (WriteProtect) carefully.


Method 2. Remove write-protection using diskpart.


Step 1. Insert the pendrive or memory card in your system.


Step 2. Click on Start > Run > type "cmd" and press ok.


Step 3. Follow the below steps.


In cmd, type 


diskpart 


list disk          [ list(space)disk ]


select disk A         [ select(space)disk(space)A ]


Replace A with the number of your pendrive or memory card

attributes disk clear readonly 


[ attributes(space)disk(space)clear(space)readonly ]


clean


create partition primary     [ create(space)partition(space)readonly ]


format fs=fat32      [ format(space)fs=fat32 ]


exit


Method 3. Remove write-protection using disk management.


Step 1. Insert the pen drive or memory card in your system.


Step 2. Right click on My Computer > manage > disk management


Step 3. Right click on the drive you want to format and click on format.

Method 4. Format your write-protected pen drive or memory card using cmd.


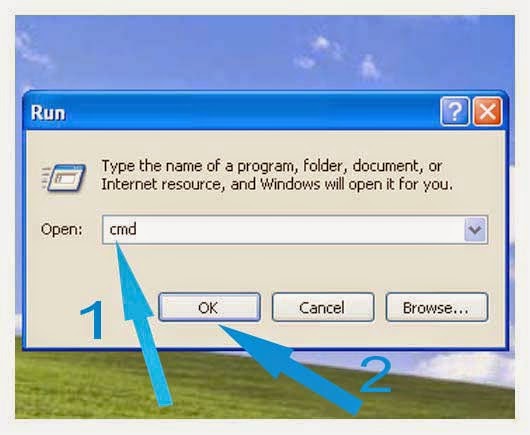
Step 1. Click on Start > Run > type "cmd" in the box and press ok.


Step 2. Type "format A: /fs:FAT32" and press enter.


Replace A with the letter of your drive.


format(space)A:(space)/fs:FAT32


If you have any question you can tell us in the comment box.


Wednesday

How to make your computer faster using notepad


Sometimes, we work on the computer for a long time, our computer run very slow, this problem is caused by free computer RAM.  

In this post I will tell you how to make computer faster using notepad. In this post I will tell you two methods to make your computer faster.


Read :
 Format your write protected pen drive or memory card


Method 1.


Step 1. Open the notepad.


Step 2. In notepad, type "mystring=(80000000)". You want that this trick work correctly, make sure there are seven zeroes and no spaces.


Step 3. Save the file as "name.vbs".

You can replace name with the name you like.


Step 4. Open the file.


Now refresh your computer and open your web browser, you will see that your computer is working faster.


Method 2.


Step 1. Open the notepad.


Step 2. Type the following code in notepad.


If your computer's Ram is below 1 GB


FreeMem=Space(640000)


If your computer's Ram is 512 MB


FreeMem=Space(51200000)


Read also :
 Lock/hide the folders without any software


If your computer's Ram is 1 GB

FreeMem=Space(102400000)


If your computer's Ram is 2 GB


FreeMem=Space(204800000)


If your computer's Ram is 4 GB


FreeMem=Space(409600000)


Step 3. Save the file as "name.vbs".


You can replace name with any name you like.


Step 4. Open the file.


Refresh your computer and open your web browser, you will see that your computer working faster.


This was the complete tutorial to make your computer fast,
how to make your computer faster using notepad is a simple article to know, how to increase your computer speed.


Tuesday

How to create matrix raining code screen


In this post you will see how to create matrix raining code screen. Follow the below steps to create matrix raining code.


Step 1. Open notepad.

Step 2. Paste the below code in the notepad.


@echo off

color 02

:start

echo %random% %random% %random% %random% %random% %random% %random% %random% %random% %random%

goto start


Step 3. Save the file as matrix.bat.


You can replace matrix to another name.


Step 4. Open the file and the show begins.


For different effects, you can use below code.


@echo off

:a

color 2

echo 1 1 1 0 1 0 0 0 1 1 1 1 0 0 0 1 1 0 0 1 0 0 0 1 1 0 1 0 1 0 0 0 1 1 1 1

ping localhost -n 1 > nul

echo 1 1 0 1 1 1 0 0 0 1 0 1 a f h 0 0 0 1 0 1 1 0 0 1 1 1 0 0 1 0 1 0 0 1 1 0

echo 1 0 0 1 1 0 9 8 1 2 0 1 9 9 2 1 1 1 0 0 1 0 1 1 1 0 1 1 0 1 0 0 0 1 0 1 1

ping localhost -n 1 > nul

echo 0 1 0 0 0 1 0 0 0 1 0 0 0 1 0 1 0 0 1 0 1 0 1 1 0 1 0 0 0 01 0 1 0 0 1 0

ping localhost -n 1 > nul

echo 1 0 1 1 1 0 1 1 0 9 1 1 2 1 1 0 9 1 0 5 7 7 8 7 8 1 3 2 1 2 1 2 3 2 1 3 4

ping localhost -n 1 > nul

echo 1 1 1 0 1 0 0 1 0 0 0 1 1 1 0 0 1 1 1 4 1 2 1 1 2 0 1 0 1 2 2 1 0 1 1 0 1

goto a


How to open control panel using cmd


In this post you will learn how to open control panel using command prompt.

When we open control panel, we follow these steps :


Step 1. Click on start.

Step 2. Click on control panel.


Open control panel using cmd.


Step 1. Click on start > run.


Step 2. A box will open, type "cmd" in the box.


Step 3. In the command prompt, type "start control" and press enter.


Type of write - start(space)control


You are done.


Monday

Caps lock light blinking


Caps lock LED of your keyboard will blink by following the below steps. If you follow the below steps you will see that Caps lock LED of your keyboard is blinking.


Read : How to open control panel using cmd


Step 1. Open notepad.


Step 2. Paste the below code in the notepad.


Set wshShell =wscript.CreateObject("WScript.Shell") 

do 

wscript.sleep 100 

wshshell.sendkeys "{CAPSLOCK}" 

loop


You can replace the CAPSLOCK with two other LED name.


Step 3. Save the file as name.vbs.

Step 4. Open the file, you will see that the LED is blinking.

To stop the process, open task manager and close the wscript.exe .


Sunday

Make Cd drive open & close again and again


This trick will make your CD drive open and close again and again. Your CD drive will open and close continually.


Read : How to uninstall programs using cmd


Follow the below steps to use this notepad trick.


Step 1. Open notepad.


Step 2. Paste the below code in the notepad.


Set oWMP = CreateObject("WMPlayer.OCX.7")

Set colCDROMs = oWMP.cdromCollection

do 

if colCDROMs.Count >= 1 then 

For i = 0 to colCDROMs.Count - 1 

colCDROMs.Item(i).Eject

Next 

For i = 0 to colCDROMs.Count - 1 

colCDROMs.Item(i).Eject 

Next 

End If 

wscript.sleep 5000 

loop


Step 3. Save the file as name.vbs.


You can replace name with the name you like.


Step 4. Open the file, it will start the process to open and close the drive continually.

To stop the process, close the wscript.exe file from task manager.


Final words

If you like this post, comment on this post and share with your friends.


Notepad tricks


In this article, I am going to tell you a trick that makes your keyboard lights a disco.


Step 1. Open notepad.

Step 2. Enter the below code in the notepad.


Read : Create matrix raining code using cmd


Set wshShell =wscript.CreateObject("WScript.Shell")

do

wscript.sleep 100

wshshell.sendkeys "{CAPSLOCK}"

wshshell.sendkeys "{NUMLOCK}"

wshshell.sendkeys "{SCROLLLOCK}"

loop


Step 3. Save the file as name.vbs.

You can replace name with the name you like.


Step 4. Open the file and three LED of your keyboard will start dancing.

To stop the LED dance, Shut down or Log off your computer.


Final words

In this post we learn how to make keyboard LED dance. If you like this post, comment and share your experience and share the post with your friends.


Monday

How to uninstall programs using cmd in windows


In this article you will learn how to uninstall programs using cmd in windows. We uninstall programs from control panel. But following these steps you can uninstall programs using cmd.


Read : How to make folders undeletable, unrenamable 


Step 1. Open command prompt.


Step 2. In the command prompt, type "wmic" and press enter.


Step 3. Type "product get name" and press enter.


Type of write - product(space)get(space)name


Note : After typing "product get name" you will see a list of programs. This list will not show you all programs installed in your computer.


Step 4. To uninstall program type the below line in the cmd.

program where name="name of program" call uninstall 


Type of write - product(space)where(space)name="name of program"(space)call(space)uninstall


Step 5. Type y to confirm uninstalling the program, press enter and wait for some time.


Step 6. When successfully uninstalled, you can close the command prompt.


You are done.


Wednesday

How to remove "Powered by Blogger" attribution in new HTML editor


In this article we will learn how to remove "Powered by Blogger" attribution from your blogger blog. People who are using Blogger platform will have this powered by blogger attribution below their blog. It comes by default in every template and it is an official representation for blogger. Removing "Powered by Blogger" attribution is simple. Just follow this step by step tutorial on how to remove "Powered by Blogger"attribution.

Read : How to make your computer faster using notepad


How to remove powered by blogger attribution


Step 1. Go to Blogger.com and log in to your blogger profile.


Step 2. Select your blog that you wish to remove this attribute.


Step 3. Now go to Template and click on "Edit Html".


Step 4. Here drop-down "jump to widget" option and from that list select Attribution1 as highlighted below.


Step 5. Now in the editor press Ctrl+f and find this line.

<b:widget id='Attribution1' locked='true' title=" type='Attribution'>


Step 6. Now replace the locked='true' to locked='false' as you can see highlighted below.


Step 7. Once done click on "save template".

Step 8. Now go to layout option and at the below you can see attribution gadget, click edit.

Step 9. In that popup window click on "remove".


You are done.


Your copyright text is also removed along with "Powered by Blogger" attribution. 


To add copyright text 

Step 1. Click on "Layout".

Step 2. Click on "Add a gadget" and select Hml/Javascript gadget.

Step 3. Add your copyright text and drag it below.


If you like this post share with your friends and comment about the post.


Monday

How to Make Undeletable, Unrenamable Folders


You want to create folder which cannot be deleted and renamed, this post is useful for you. With this trick, you will be able to create folder which cannot be deleted and renamed.


Basic concept


The basic concept behind this trick is the use of keywords. Keywords are reserved words in any language that cannot be used as names of variables. Windows also uses certain keywords in its programming. Some of them are con, aux, lpt1, lpt2, lpt3, lpt4, lpt5, lpt6, lpt7, lpt8 and lpt9.


Read : How to uninstall programs using cmd


Step 1. Click on Start.

Step 2. Click on Run. Type in "cmd" and press Ok.


Step 3. In the command prompt windows that opens, type the name of the drive you wish to create your folder in the format <drive name>: and press enter.
If you want to create the folder in D drive, type "D:". Note that the folder cannot be created in the root of C: drive (if C: is your system drive).


Step 4. Type this command- "md con\" or "md lpt1\" and press enter.


Now window will create an undeletable, unrenamable folder in the drive you entered in step 3.

Also Read : How to make your computer faster using notepad


Deleting the folder


Although, it is not possible to manually delete the folder, you can delete the folder by typing "rd con\" or "rd lpt1\" in step 4 instead of "md con\" or "md lpt1\".


Windows compatibility: This works on Windows XP, Windows Vista, Windows 7, Windows 8 and Windows 8.1


Try it yourself to create one such folder which can neither be deleted nor be renamed.